Welcome to this (hopefully) monthly cooking column! My name is Ben, and I ran the home-delivery bakery “Hveiti og Smjör” (Icelandic for Flour and Butter). The editors have asked me to try to work up our collective kitchen skills, and two of my passions are teaching and baking, so I am really excited.
These first few articles are going to cover some basics before we move on, and this first one: Pie crust. This recipe is so simple, but it opens up a world of options. Pie crust allows desserts and mains like quiche. So pull up a chair and impress your next date (or your current partner) with some new cooking skills.
As a quick background, baking employs the Maillard reaction, which according to Wikipedia just means, “a chemical reaction between amino acids and reducing sugars that gives browned foods their desirable flavor.” This can be understood more simply as the flavor change that comes from toasting something, normally bread, but also steaks. This is where that delicious flavor of toast comes from that is not present in untoasted bread. This is also the primary flavor change once cookies are baked, as well as dough like pie crust!

- 1 cup of all-purpose flour
- 100 grams of butter
- 1/2 teaspoons salt
- 1 teaspoon of lemon juice
- a bowl of ice cold water
- Take a plastic bowl, add the flour and salt and mix well (If making a dessert pie, you can add a tablespoon of sugar, and a teaspoon of cinnamon, but it’s not necessary).
- Next add in the butter after cutting it into cubes. Using a [url href=”https://en.wikipedia.org/wiki/Pastry_blender” target=”_blank”]pastry blender[/url] (available at most kitchen supply stores) or a regular knife (which will take much longer) “cut” the butter into the flour. Your goal is to end up with pea sized lumps of butter.
- Next comes the ice water, which is what will now bind this into an actual dough we can roll out. Add a little at a time, mixing very gently with your hand until it all comes together. Err on the side of dry dough rather than wet glop.
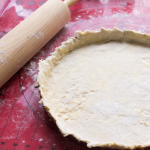
- On a dry surface (I use a nice vinyl mat) powder with flour (a shaker with large holes, filled with flour, makes quick work of dusting a surface with flour so dough doesn’t stick)
- Roll out with a floured rolling pin. You should still be able to see large chunks of butter in the dough (these will turn into flaky pockets)
- Do not overwork the dough. Your goal is to get a large enough disc to fit in your pie plate. Choose a pie plate with fluted rim if you can, it will “hold” the dough when baking. A flat sided pie plate will allow the dough to sink in toward the bottom when baking.
- Fit the dough disc into your pie plate, and pull off any extra that sticks out, using it to repair any gaps or edges that don’t come up high enough. Now put in the fridge for as long as you can wait (preferably 1-4 hours, overnight is fine too). This will let the dough “rest” and the butter to re-chill after being worked, which will again allow for a flakier crust that holds its shape when baking.
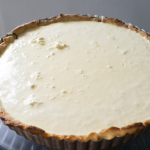
- Preheat your oven to 220°C (430°F) while the dough is chilling, pull the dough out of the fridge, poke the bottom well with a fork (or it might bubble up while baking). To be super sure it does not slide down the sides, line the dough with aluminum foil, and then fill with dry rice or beans to act as weights that emulate the actual pie filling that will come later. I sometimes skip the foil/rice step and it comes out fine, but your mileage may vary. Then slide it in for 8 minutes, or until lightly brown (this could take up to 20 minute depending on how thick you rolled it out). Pull it out and let it cool while you make the filling.
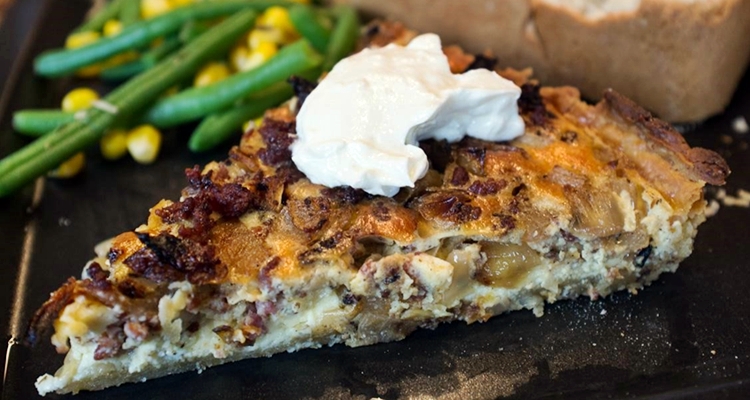
- Depending on your pie dish size, you’ll have to adjust the number of eggs and cream to use, but a good rule of thumb is to use equal amounts egg and cream. Mine fit three eggs and a small 250 ml carton of cream. I then added about 1 cup of shredded cheese. All of the filling for quiche is flexible, as long as there is enough egg to bake into a solid.
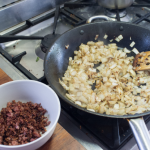
- I put the egg/cream mixture in first, then sprinkled in the cheese, and added in the cooked bacon and onion on top, doing a little bit of mixing with a fork so that egg mixture got on top of the toppings.
- Bake between 15-45 minutes. 15 for wide thin quiches like this one, and 45 for a really deep quiche dishes to make sure the eggs bake solid.
- Allow to cool for a bit, 5-10 minutes, then serve. Top with sour cream and serve with veggies and a starch (bread or potatoes).